
What are detail textures?
Detail textures are special kind of textures which if used properly, can simulate plaster, scratches, bumpmaps, etc. They are very easy to use and can improve the the visuals of the map dramatically. You don't need to compile the map to place the detail textures. They look like this:

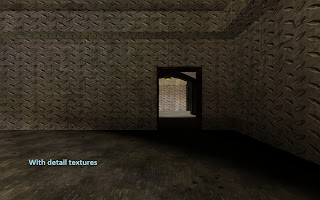
I must admit I have chosen a bad example. However, download a map name de_mon. It features detail textures and the map itself is visually spectacular.
They work as overlays and are placed over the default textures. Contrary to popular opinion, they are compatible in every version of cs.
How to implement detail textures?
Very simple. Just type r_detailtextures 1 in the console while the game is running. If they still don't show up, type r_detailtexturessupported 1 in the console. You need to test it in a map supporting detail texture.
( For czero users: There is an option given in the video menu to turn on the detail texture)
How to make detail textures.
First of all, open a photo editing program like photoshop or gimp and create a new file preferably having a 256x256 resolution. Add a few scratch marks with brushes or insert a new layer full of scratches and dust marks and change the blending mode to overlay. Experiment with different values and when you are finally done, convert the texture to greyscale colour.
This is important because detail textures use the middle value of rgb as transparency. So 128 128 128 simulates alpha while any value below or above this value will give a color hue. For eg: you have a pic which has exactly 128 as its rgb value. However, there is a scratch mark in the middle of the texture. The left side of the mark is 188 in rgb and the the right side is 68 in rgb. Hence, only the scratch mark will be visible in game and it will also give a feeling of a bumpmap. A sample detail texture looks like this:

Now save the the file in tga format and save it in your cstrike/gfx/detail/<your map name> folder. If the folder is not present, make a new one. For eg: if my map name is foo then make a folder in cstrike/gfx/detail/foo. If you wish, you can continue without making a new folder but it is a good practice to make a folder and give it your map name.
Now make a text file in your cstrike/maps folder and name it as <name of your map>_detail.txt. For eg: If I have a map called foo.bsp, make a foo_detail.txt file in the maps folder and open the file. Place the following in your file:
<name of the texture on which you want to place the detail texture> < detail/<foo>/<foo.tga> < x axis scale> < y axis scale>
For eg: One of my map whose name is aim_err has the following text file.
C2A1_W1 detail/aim_err/detail1 6.0 6.0
SILO2_WET4B detail/aim_err/detail2 2.0 2.0
Simple isn't it?
The detail1 and detail2 are my detail textures and the c2a1_w1 and silo2_wetb are the standard texture. The values of the two axis are inverse meaning that lower values like 2.0 will stretch the texture while values like 6.0 will shrink the texture.
Tips
Implement the detail texture when you have finished making your map.
Making the x and y axis values are different is not recommended unless the base textures are stretched. This is because the detail textures will use the axis of the base textures as the starting point and will resize as you have specified.
Use detail textures sparingly. This is because they don't increase the r_speeds but they do affect the fps of the map. One good optimization point would be to use a single detail texture file for more than 2 base textures.
The best part is that you can make existing maps like de_dust look great.
Detail textures are special kind of textures which if used properly, can simulate plaster, scratches, bumpmaps, etc. They are very easy to use and can improve the the visuals of the map dramatically. You don't need to compile the map to place the detail textures. They look like this:


I must admit I have chosen a bad example. However, download a map name de_mon. It features detail textures and the map itself is visually spectacular.
They work as overlays and are placed over the default textures. Contrary to popular opinion, they are compatible in every version of cs.
How to implement detail textures?
Very simple. Just type r_detailtextures 1 in the console while the game is running. If they still don't show up, type r_detailtexturessupported 1 in the console. You need to test it in a map supporting detail texture.
( For czero users: There is an option given in the video menu to turn on the detail texture)
How to make detail textures.
First of all, open a photo editing program like photoshop or gimp and create a new file preferably having a 256x256 resolution. Add a few scratch marks with brushes or insert a new layer full of scratches and dust marks and change the blending mode to overlay. Experiment with different values and when you are finally done, convert the texture to greyscale colour.
This is important because detail textures use the middle value of rgb as transparency. So 128 128 128 simulates alpha while any value below or above this value will give a color hue. For eg: you have a pic which has exactly 128 as its rgb value. However, there is a scratch mark in the middle of the texture. The left side of the mark is 188 in rgb and the the right side is 68 in rgb. Hence, only the scratch mark will be visible in game and it will also give a feeling of a bumpmap. A sample detail texture looks like this:
Now make a text file in your cstrike/maps folder and name it as <name of your map>_detail.txt. For eg: If I have a map called foo.bsp, make a foo_detail.txt file in the maps folder and open the file. Place the following in your file:
<name of the texture on which you want to place the detail texture> < detail/<foo>/<foo.tga> < x axis scale> < y axis scale>
For eg: One of my map whose name is aim_err has the following text file.
C2A1_W1 detail/aim_err/detail1 6.0 6.0
SILO2_WET4B detail/aim_err/detail2 2.0 2.0
Simple isn't it?
The detail1 and detail2 are my detail textures and the c2a1_w1 and silo2_wetb are the standard texture. The values of the two axis are inverse meaning that lower values like 2.0 will stretch the texture while values like 6.0 will shrink the texture.
Tips
Implement the detail texture when you have finished making your map.
Making the x and y axis values are different is not recommended unless the base textures are stretched. This is because the detail textures will use the axis of the base textures as the starting point and will resize as you have specified.
Use detail textures sparingly. This is because they don't increase the r_speeds but they do affect the fps of the map. One good optimization point would be to use a single detail texture file for more than 2 base textures.
The best part is that you can make existing maps like de_dust look great.
No comments:
Post a Comment
Post your views here